
En este tutorial, aprenderás a construir un sistema de temporizador programable utilizando un ESP32, un display OLED SH1106 y un servidor web. Este proyecto es ideal para automatizar el encendido y apagado de una luz o cualquier dispositivo conectado, estableciendo horarios específicos desde una interfaz web fácil de usar.
Tal vez pueda interesarte proyectos en arduino, pic, robótica, telecomunicaciones, suscribete en http://www.youtube.com/user/carlosvolt?sub_confirmation=1 mucho videos con código fuentes completos y diagramas

Características Principales:
- Programación de horarios: Configura horas y fechas para encender y apagar el dispositivo conectado.
- Conectividad WiFi: Controla y visualiza el estado del sistema desde cualquier dispositivo en la misma red.
- Persistencia de datos: Los horarios y el estado del dispositivo se guardan en la memoria, incluso después de un reinicio.
- Interfaz gráfica: Muestra información en tiempo real, como la hora actual, la IP del dispositivo, y los horarios programados en un display OLED.
Requisitos Previos:
Antes de comenzar, asegúrate de tener conocimientos básicos sobre:
- Programación en Arduino IDE
- Configuración de redes WiFi
- Uso de componentes electrónicos básicos
Con este proyecto, podrás automatizar tareas cotidianas, optimizando tiempo y recursos. ¡Manos a la obra!
Componentes electrónicos
Un Esp32

Características del módulo ESP32-T

Conectividad
El módulo ESP32 dispone de todas las variantes del WiFi:
- 802.11 b/g/n/e/i/n
- Wi-Fi Direct (P2P), P2P Discovery, P2P Group Owner mode and P2P Power Management
Esta versión nueva incluye la conectividad mediante Bluethoot de bajo consumo
- Bluetooth v4.2 BR/EDR and BLE
- BLE Beacon
Además, puede comunicarse mediante los protocoles SPI, I2C, UART, MAC Ethernet, Host SD
Prestaciones del microcontrolador
La CPU está formado por un SoC modelo Tensilica LX6 con las siguientes características y memoria
- Doble núcleo de 32 bits con velocidad de 160MHz
- Memoria ROM de 448 kBytes
- Memoria SRAM de 520kBytes
Dispne de 48 Pines
- 18 ADC de 12 bits
- 2 DAC de 8 bits
- 10 pines sensores de contacto
- 16 PWM
- 20 Entradas/salidas digitales
Alimentación y modos de consumo
Para un correcto funcionamiento del ESP32 es necesario subministrar un voltaje de entre 2,8V y 3,6V. La energía que consume depende del modo de funcionamiento. Contiene un modo, el Ultra Low Power Solution (ULP), en que se continúan realizando tareas básicas (ADC, RTC…) en el modo Sleep.
Pines hembra

Cables dupont hembra macho

Display oled sh1106
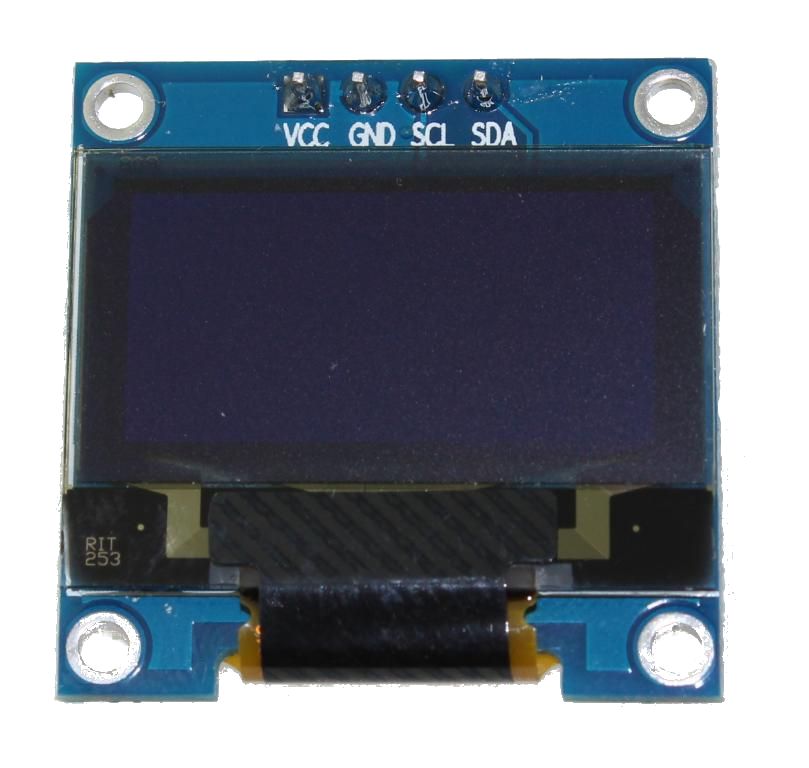
Se trata de un módulo de pantalla OLED monocromática DE 128×64 puntos con interface I2C .Que presenta varias ventajas en comparación con pantallas LCD, y podemos destacar su alto brillo, un muy buen contraste, un ángulo de visión más amplio, y bajo consumo de energía. ES compatible con Arduino Rasberry Pi y microcontroladores PIC entre otros. Trabaja con niveles lógicos de 3.3V a 5V tiene un angulo de visión mayor a los 160 grados. el Tamaño de la pantalla es de 1,3 pulgadas. Se alimenta con un voltaje de 3.3V a 5V Se lo puede usar en aplicaciones como relojes inteligentes, MP3, termómetros, instrumentos, y proyectos varios, etc.
Características
- Interface: I2C(3.3V / 5V logic level)
- Resolution: 128 x 64
- Angle of view: >160 degree
- Display color: Blue
- Display size: 1.3 inch
- Driver IC: SH1106
- Power supply: DC 3.3V~5V
- Operating temperature: -20~70’C
- Application: smart watch, MP3, thermometer, instruments, DIY projects, etc.
PCB


Descargar archivo gerber –> Gerber_esp32
Circuito

Código Fuente
|
1 2 3 4 5 6 7 8 9 10 11 12 13 14 15 16 17 18 19 20 21 22 23 24 25 26 27 28 29 30 31 32 33 34 35 36 37 38 39 40 41 42 43 44 45 46 47 48 49 50 51 52 53 54 55 56 57 58 59 60 61 62 63 64 65 66 67 68 69 70 71 72 73 74 75 76 77 78 79 80 81 82 83 84 85 86 87 88 89 90 91 92 93 94 95 96 97 98 99 100 101 102 103 104 105 106 107 108 109 110 111 112 113 114 115 116 117 118 119 120 121 122 123 124 125 126 127 128 129 130 131 132 133 134 135 136 137 138 139 140 141 142 143 144 145 146 147 148 149 150 151 152 153 154 155 156 157 158 159 160 161 162 163 164 165 166 167 168 169 170 171 172 173 174 175 176 177 178 179 180 181 182 183 184 185 186 187 188 189 190 191 192 193 194 195 196 197 198 199 200 201 202 203 204 205 206 207 208 209 210 211 212 |
#include <WiFi.h> #include <NTPClient.h> #include <WiFiUdp.h> #include <EEPROM.h> #include <ESPAsyncWebServer.h> #include <TimeLib.h> #include <U8g2lib.h> #include <Wire.h> // Configuración WiFi const char* ssid = "Tu_Red_wifi"; const char* password = "Tu_Clave_Wifi"; // Configuración OLED U8G2_SH1106_128X64_NONAME_F_HW_I2C u8g2(U8G2_R0, /* reset=*/ U8X8_PIN_NONE); // Configuración NTP WiFiUDP ntpUDP; NTPClient timeClient(ntpUDP, "pool.ntp.org", -3 * 3600, 60000); // Configuración del servidor web AsyncWebServer server(80); // Configuración de pines #define LIGHT_PIN 12 // Variables globales int onHour, onMinute, offHour, offMinute; int onDay, onMonth, onYear; int offDay, offMonth, offYear; bool lightStatus = false; // Funciones de configuración y estado void saveSettings() { EEPROM.write(0, onHour); EEPROM.write(1, onMinute); EEPROM.write(2, offHour); EEPROM.write(3, offMinute); EEPROM.write(4, lightStatus); EEPROM.write(5, onDay); EEPROM.write(6, onMonth); EEPROM.write(7, onYear - 2000); EEPROM.write(8, offDay); EEPROM.write(9, offMonth); EEPROM.write(10, offYear - 2000); EEPROM.commit(); } void loadSettings() { onHour = EEPROM.read(0); onMinute = EEPROM.read(1); offHour = EEPROM.read(2); offMinute = EEPROM.read(3); lightStatus = EEPROM.read(4); onDay = EEPROM.read(5); onMonth = EEPROM.read(6); onYear = EEPROM.read(7) + 2000; offDay = EEPROM.read(8); offMonth = EEPROM.read(9); offYear = EEPROM.read(10) + 2000; } void updateLightState() { digitalWrite(LIGHT_PIN, lightStatus ? HIGH : LOW); Serial.println(lightStatus ? "Luz encendida" : "Luz apagada"); updateOLEDDisplay(); // Actualizar display cuando cambia el estado } // Función para actualizar el display OLED void updateOLEDDisplay() { u8g2.clearBuffer(); u8g2.setFont(u8g2_font_ncenB08_tr); // Elegir una fuente // Mostrar hora y fecha actual char currentTimeStr[30]; snprintf(currentTimeStr, sizeof(currentTimeStr), "%02d:%02d:%02d %02d/%02d/%04d", hour(), minute(), second(), day(), month(), year()); u8g2.drawStr(0, 10, "Hora Actual:"); u8g2.drawStr(0, 20, currentTimeStr); // Mostrar hora de encendido programada char onTimeStr[30]; snprintf(onTimeStr, sizeof(onTimeStr), "%02d:%02d %02d/%02d/%04d", onHour, onMinute, onDay, onMonth, onYear); u8g2.drawStr(0, 30, "Enc:"); u8g2.drawStr(30, 30, onTimeStr); // Mostrar hora de apagado programada char offTimeStr[30]; snprintf(offTimeStr, sizeof(offTimeStr), "%02d:%02d %02d/%02d/%04d", offHour, offMinute, offDay, offMonth, offYear); u8g2.drawStr(0, 50, "Apa:"); u8g2.drawStr(30, 50, offTimeStr); // Mostrar dirección IP u8g2.drawStr(0, 64, WiFi.localIP().toString().c_str()); u8g2.sendBuffer(); } // Configuración inicial void setup() { pinMode(LIGHT_PIN, OUTPUT); Serial.begin(115200); // Inicializar OLED Wire.begin(); u8g2.begin(); u8g2.clearBuffer(); u8g2.setFont(u8g2_font_ncenB08_tr); u8g2.drawStr(0, 10, "Iniciando..."); u8g2.sendBuffer(); EEPROM.begin(512); loadSettings(); updateLightState(); WiFi.begin(ssid, password); while (WiFi.status() != WL_CONNECTED) { delay(1000); Serial.println("Conectando a WiFi..."); } Serial.println("WiFi conectado"); Serial.print("Dirección IP: "); Serial.println(WiFi.localIP()); timeClient.begin(); timeClient.update(); // Actualización inmediata al inicio time_t now = timeClient.getEpochTime(); setTime(now); updateOLEDDisplay(); // Actualizar display con la hora exacta al inicio server.on("/", HTTP_GET, [](AsyncWebServerRequest *request) { String html = "<h1>Programar Temporizador</h1>"; timeClient.update(); time_t now = timeClient.getEpochTime(); setTime(now); html += "<p>Hora actual: " + String(hour()) + ":" + String(minute()) + ":" + String(second()) + "</p>"; html += "<p>Fecha actual: " + String(day()) + "/" + String(month()) + "/" + String(year()) + "</p>"; html += "<p><b>Estado de la Luz:</b> " + String(lightStatus ? "Encendida" : "Apagada") + "</p>"; html += "<p><b>Encendido Programado:</b> " + String(onDay) + "/" + String(onMonth) + "/" + String(onYear) + " " + String(onHour) + ":" + String(onMinute) + "</p>"; html += "<p><b>Apagado Programado:</b> " + String(offDay) + "/" + String(offMonth) + "/" + String(offYear) + " " + String(offHour) + ":" + String(offMinute) + "</p>"; html += "<form action='/set' method='GET'>" "Encender: Hora <input type='time' name='onTime'> Fecha <input type='date' name='onDate'><br>" "Apagar: Hora <input type='time' name='offTime'> Fecha <input type='date' name='offDate'><br>" "<input type='submit' value='Guardar'>" "</form>"; request->send(200, "text/html", html); }); server.on("/set", HTTP_GET, [](AsyncWebServerRequest *request) { if (request->hasParam("onTime") && request->hasParam("onDate") && request->hasParam("offTime") && request->hasParam("offDate")) { String onTime = request->getParam("onTime")->value(); String onDate = request->getParam("onDate")->value(); String offTime = request->getParam("offTime")->value(); String offDate = request->getParam("offDate")->value(); onHour = onTime.substring(0, 2).toInt(); onMinute = onTime.substring(3, 5).toInt(); onYear = onDate.substring(0, 4).toInt(); onMonth = onDate.substring(5, 7).toInt(); onDay = onDate.substring(8, 10).toInt(); offHour = offTime.substring(0, 2).toInt(); offMinute = offTime.substring(3, 5).toInt(); offYear = offDate.substring(0, 4).toInt(); offMonth = offDate.substring(5, 7).toInt(); offDay = offDate.substring(8, 10).toInt(); saveSettings(); updateOLEDDisplay(); // Actualizar display después de guardar request->send(200, "text/html", "<h1>Guardado!</h1><a href='/'>Volver</a>"); } else { request->send(400, "text/html", "Faltan parámetros"); } }); server.begin(); } void loop() { timeClient.update(); time_t now = timeClient.getEpochTime(); setTime(now); // Actualizar display cada segundo static unsigned long lastDisplayUpdate = 0; if (millis() - lastDisplayUpdate > 1000) { updateOLEDDisplay(); lastDisplayUpdate = millis(); } if (year() == onYear && month() == onMonth && day() == onDay && hour() == onHour && minute() == onMinute && !lightStatus) { lightStatus = true; saveSettings(); updateLightState(); } else if (year() == offYear && month() == offMonth && day() == offDay && hour() == offHour && minute() == offMinute && lightStatus) { lightStatus = false; saveSettings(); updateLightState(); } } |
No te pierdas ningún video más suscríbete a nuestro canal de telegram https://t.me/carlosvolt_electronica_robotica
PROYECTO RECOMENDADO